
Guide
How to take good pictures of someone with your iPhone
Hold the phone at their eye level for a close-up and at their waist, tilted up a little, for a full-length photo. Stand back far enough to use 1× or 2× instead of 0.5×, keep the phone level, and give one instruction at a time. Take several frames of each pose and show them the best one before you move on.
Phone height, tilt and distance for each shot
Most bad photos of people come from one habit: the person holding the phone keeps it at their own eye level for every shot. The right height depends on how much of the person you want in the frame.
| Shot | Phone height | Tilt | Distance | In the frame |
|---|---|---|---|---|
| Close-up (head and shoulders) | Their eye level | Straight | About 1 m (3 ft) at 2× | Eyes on the upper third line, a little space above the head |
| Waist up | Their chest | Straight | About 1.5 m (5 ft) at 2×, or 0.7 m at 1× | Cut at the hips, not at the waist or the elbows |
| Full length | Their waist | Up a little | About 2 m (6–7 ft) at 1×, or 3.5 m (11 ft) at 2× | Head and shoes, with a small gap above and below |
| Two to four people | Chest of the shortest person | Straight | Step back until everyone fits with space at the sides | All faces in view, heads at slightly different heights |
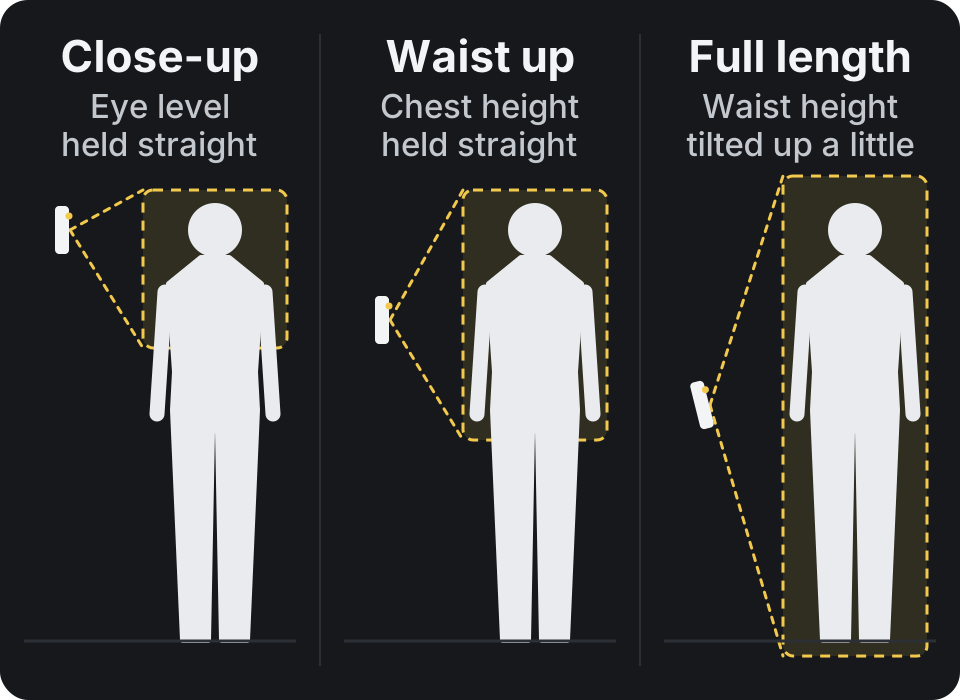
Why it works: the parts of a person closest to the lens look larger. A phone held high and tilted down puts the head closest, so the legs look short. A phone at the waist, tilted up a little, puts the legs closer, so they keep their full length.
Three camera settings to check first
- Turn on the grid and the level. Open Settings, tap Camera, then turn on Grid and Level. The grid gives you the thirds lines for the eyes, and the level shows when the phone is straight.
- Set focus and brightness on the face. Tap their face on the screen. Next to the focus area, drag up or down to make the photo brighter or darker. To keep that setting for the next shots, touch and hold the face until you see AE/AF Lock.
- Shoot a burst for moving poses. Drag the shutter button to the left to take photos in rapid succession, and lift your finger to stop. You then keep only the frames you like.
These steps follow Apple's iPhone User Guide. Button names can differ a little between iOS versions.
Step by step: a full-length photo
Full-length photos go wrong most often, so start here. The goal is long legs, the whole outfit and a face that looks like them.
- Pick the light first. Turn them toward the light: a window, open shade or a low sun. Avoid a bright sky right behind them, which turns the face dark.
- Check the background. Look for a pole or tree that grows out of their head, and take one step to the side if you see one.
- Step back. Stand about 2 m (6–7 ft) away at 1×, or about 3.5 m (11 ft) at 2×. More distance keeps the body in proportion.
- Lower the phone to their waist. Bend your knees or crouch a little. Hold the phone upright, never flat.
- Tilt it up a little. Only enough to keep a small gap above the head. A strong tilt makes the head look small.
- Frame head to shoes. Leave a little space under the shoes and above the head. Never cut at the ankles or the knees.
- Level the phone. The level and the grid help: vertical lines in the background should stay vertical.
- Give one instruction. For example: “Weight on your back leg, front foot a little forward.” Then shoot.
- Take several frames and check them together. Change one thing per round: the pose, the distance or the phone height.
Close-ups that look like them
People often say they look “wider” in photos than in the mirror. The usual cause is distance: a wide lens held close makes the nose and the middle of the face larger. Step back and zoom in instead.
- Distance: about 1 m (3 ft) away at 2×. If your iPhone shows no 2× button, step back and crop the photo later.
- Height: their eye level, phone straight. A phone a little above the eyes and tilted down slightly gives a softer, open face; a phone a little below the eyes looks more confident.
- Placement: eyes on the upper grid line. Put the face a little off center and leave space on the side they look toward.
- Crop: keep the chin and the top of the shoulders in the frame. Cutting off the top of the head is fine for a tight portrait; cutting off the chin is not.
What to say while you shoot
Most people freeze when a camera points at them. Vague directions make it worse. Give one specific, physical instruction at a time, and show it with your own body if needed.
| Instead of | Say |
|---|---|
| “Relax.” | “Put your weight on your back leg.” |
| “Do something with your hands.” | “One hand in your pocket.” or “Fix your sleeve and look down at it.” |
| “Stand normally.” | “Front foot a little forward, toward me.” |
| “Smile.” | “Look past me… now back at the lens.” |
| “Move over.” | “One small step to your left.” |
| “You look stiff.” | “Walk slowly toward me and look up when I say now.” |
After the first few frames, show them the screen. Asking “which one do you like?” tells you more than any rule, and it makes the rest of the shoot easier for both of you.
Common mistakes and their fixes
| In the photo | Usual cause | Fix |
|---|---|---|
| Short legs | Phone at your eye level, tilted down | Lower the phone to their waist and tilt it up a little |
| Feet cut off | Standing too close, or framing from the face down | Step back and place the shoes first, then check the head |
| Face looks wider | 0.5× or 1× from very close | Step back and use 2× |
| Tilted horizon | Phone rolled to one side | Turn on Level and keep background lines straight |
| Too much empty space above the head | Face in the middle of the frame | Put the eyes on the upper grid line |
| Dark face | Bright sky or window behind them | Turn them toward the light, or tap the face and drag the brightness up |
| Stiff hands | Hands with nothing to do | Give the hands a job: pocket, hair, collar, sleeve |
| Closed eyes | One frame per pose | Take a burst or several frames |
Let the camera coach you
Rules are hard to remember while someone waits in front of you. Frame Coach puts them on the camera screen.
Frame Coach for iPhone
Pick a pose and a white figure appears on the camera. Line the person up with it, and one short hint at a time tells you what to change:
- “Lower the phone below their eyes and tilt it up”
- “Step back a little”
- “Straighten the phone: no sideways tilt”
- “Ask them to put the hand where the figure's hand is”
When everything matches, it says “Perfect, take the shot”. Not sure which pose fits the place? Tap Auto pose and point the camera at the spot: it finds poses that fit and shows where to stand. Some poses are free; Pro opens all of them. Works on any iPhone with iOS 18 or later, and the camera feed stays on the phone.

We make Frame Coach. Everything else on this page works with the iPhone Camera app.
Questions
What is the best angle to take a picture of someone?
For a face, hold the phone at their eye level and keep it straight. For a full-length photo, lower the phone to their waist and tilt it up a little. Avoid shooting down at a standing person from your own eye level: it shortens the legs and makes the head look big.
Should you hold the phone high or low for photos of someone?
Match the phone to the shot. Close-ups: their eye level. Waist-up photos: their chest. Full-length photos: their waist, tilted up a little. A phone held high above their eyes and tilted down makes them look shorter.
How do you make someone look taller in photos?
Lower the phone to their waist, tilt it up a little and keep their shoes near the bottom edge of the frame with a small gap. Step back instead of switching to 0.5×, and never cut the photo at the ankles or knees.
Is 0.5x good for full-body photos?
0.5× fits a whole person in from close up, but it stretches whatever is near the edges and close to the lens. If you use it, keep the person in the middle of the frame and do not stand close. For most photos of people, step back and use 1× or 2×.
How do I take good pictures of my girlfriend or boyfriend?
Use the same rules: the right phone height for the shot, enough distance to use 1× or 2×, a level phone, and one clear instruction at a time. Take several frames of each pose and show them the best one before you move on, so you both agree on what works.
How many photos should I take of each pose?
Take a short burst or five to ten frames of each pose, then check them together. Blinks and half-smiles are common, so one frame is rarely enough. Fix one thing at a time between rounds.
Sources
- Apple Support: Use iPhone camera tools to set up your shot (grid and level, focus and exposure, AE/AF Lock), checked November 7, 2026.
- Apple Support: Capture action shots with Burst mode, checked November 7, 2026.
More guides: all Frame Coach guides.